
How to make the class timetable
SchoolEasy builds the weekly timetable of every section at once, so no teacher, room or section is ever in two places at the same time. It only needs a few things from you first. Set them up in the order below, then the generator does the rest in five short screens.
Admins, and staff who have the Edit timetables permission.Updated
Before you start
Set these up in this order: each one is chosen inside the next, so a class needs its branch and a student needs a section. They are ordinary pages. Open each one and add what it asks for.
- 1
Academic session
NeededStart this year's session and make it the active one.
Why: The timetable belongs to the active session. The generator stops without one.
Sessions - 2
Branch
NeededAdd your campus. A school with one building still has one branch.
Why: You choose the sections to arrange branch by branch.
Branches - 3
Rooms
RecommendedEach room's number, its branch, and its benches and seats per bench.
Why: Each section's periods go in its home room, and a lab can be given to a subject. Without rooms, periods are saved with no room.
Settings → Rooms - 4
Classes
NeededClass 1 to Class 10, or your own names, each in its branch.
Why: Every section belongs to a class, and the class decides its subjects.
Classes - 5
Subjects
NeededThe subjects each class studies.
Why: The generator places every subject of the class. A class with no subjects has nothing to place.
Classes → open a class → Subjects - 6
Sections
NeededEach class's sections, such as 8 A and 8 B. SchoolEasy calls them batches. Give each one its home room.
Why: A timetable is made for each section.
Batches - 7
Educators
NeededAn account for every teacher.
Why: Every subject needs a teacher, and a teacher is never put in two sections at the same time.
Educators - 8
Students
OptionalEvery student, enrolled in a class and a section.
Why: Only used to warn you when a section has more students than its room seats.
Students
The steps
Step 1
Give every subject a teacher
Batches → open a section → Educators tabOpen a section and go to its Educators tab. For each subject press Assign Faculty (Change, once it has a teacher), pick the teacher, keep Primary Teacher as the role and set Periods / Week. Use Double Periods for practicals that need two periods back to back. On the class teacher's subject, tick Designate as Batch Incharge / Class Teacher: the generator can then give them the first period.
Finished one section? On the next one, Copy from Batch brings in the same teachers, ready to change.
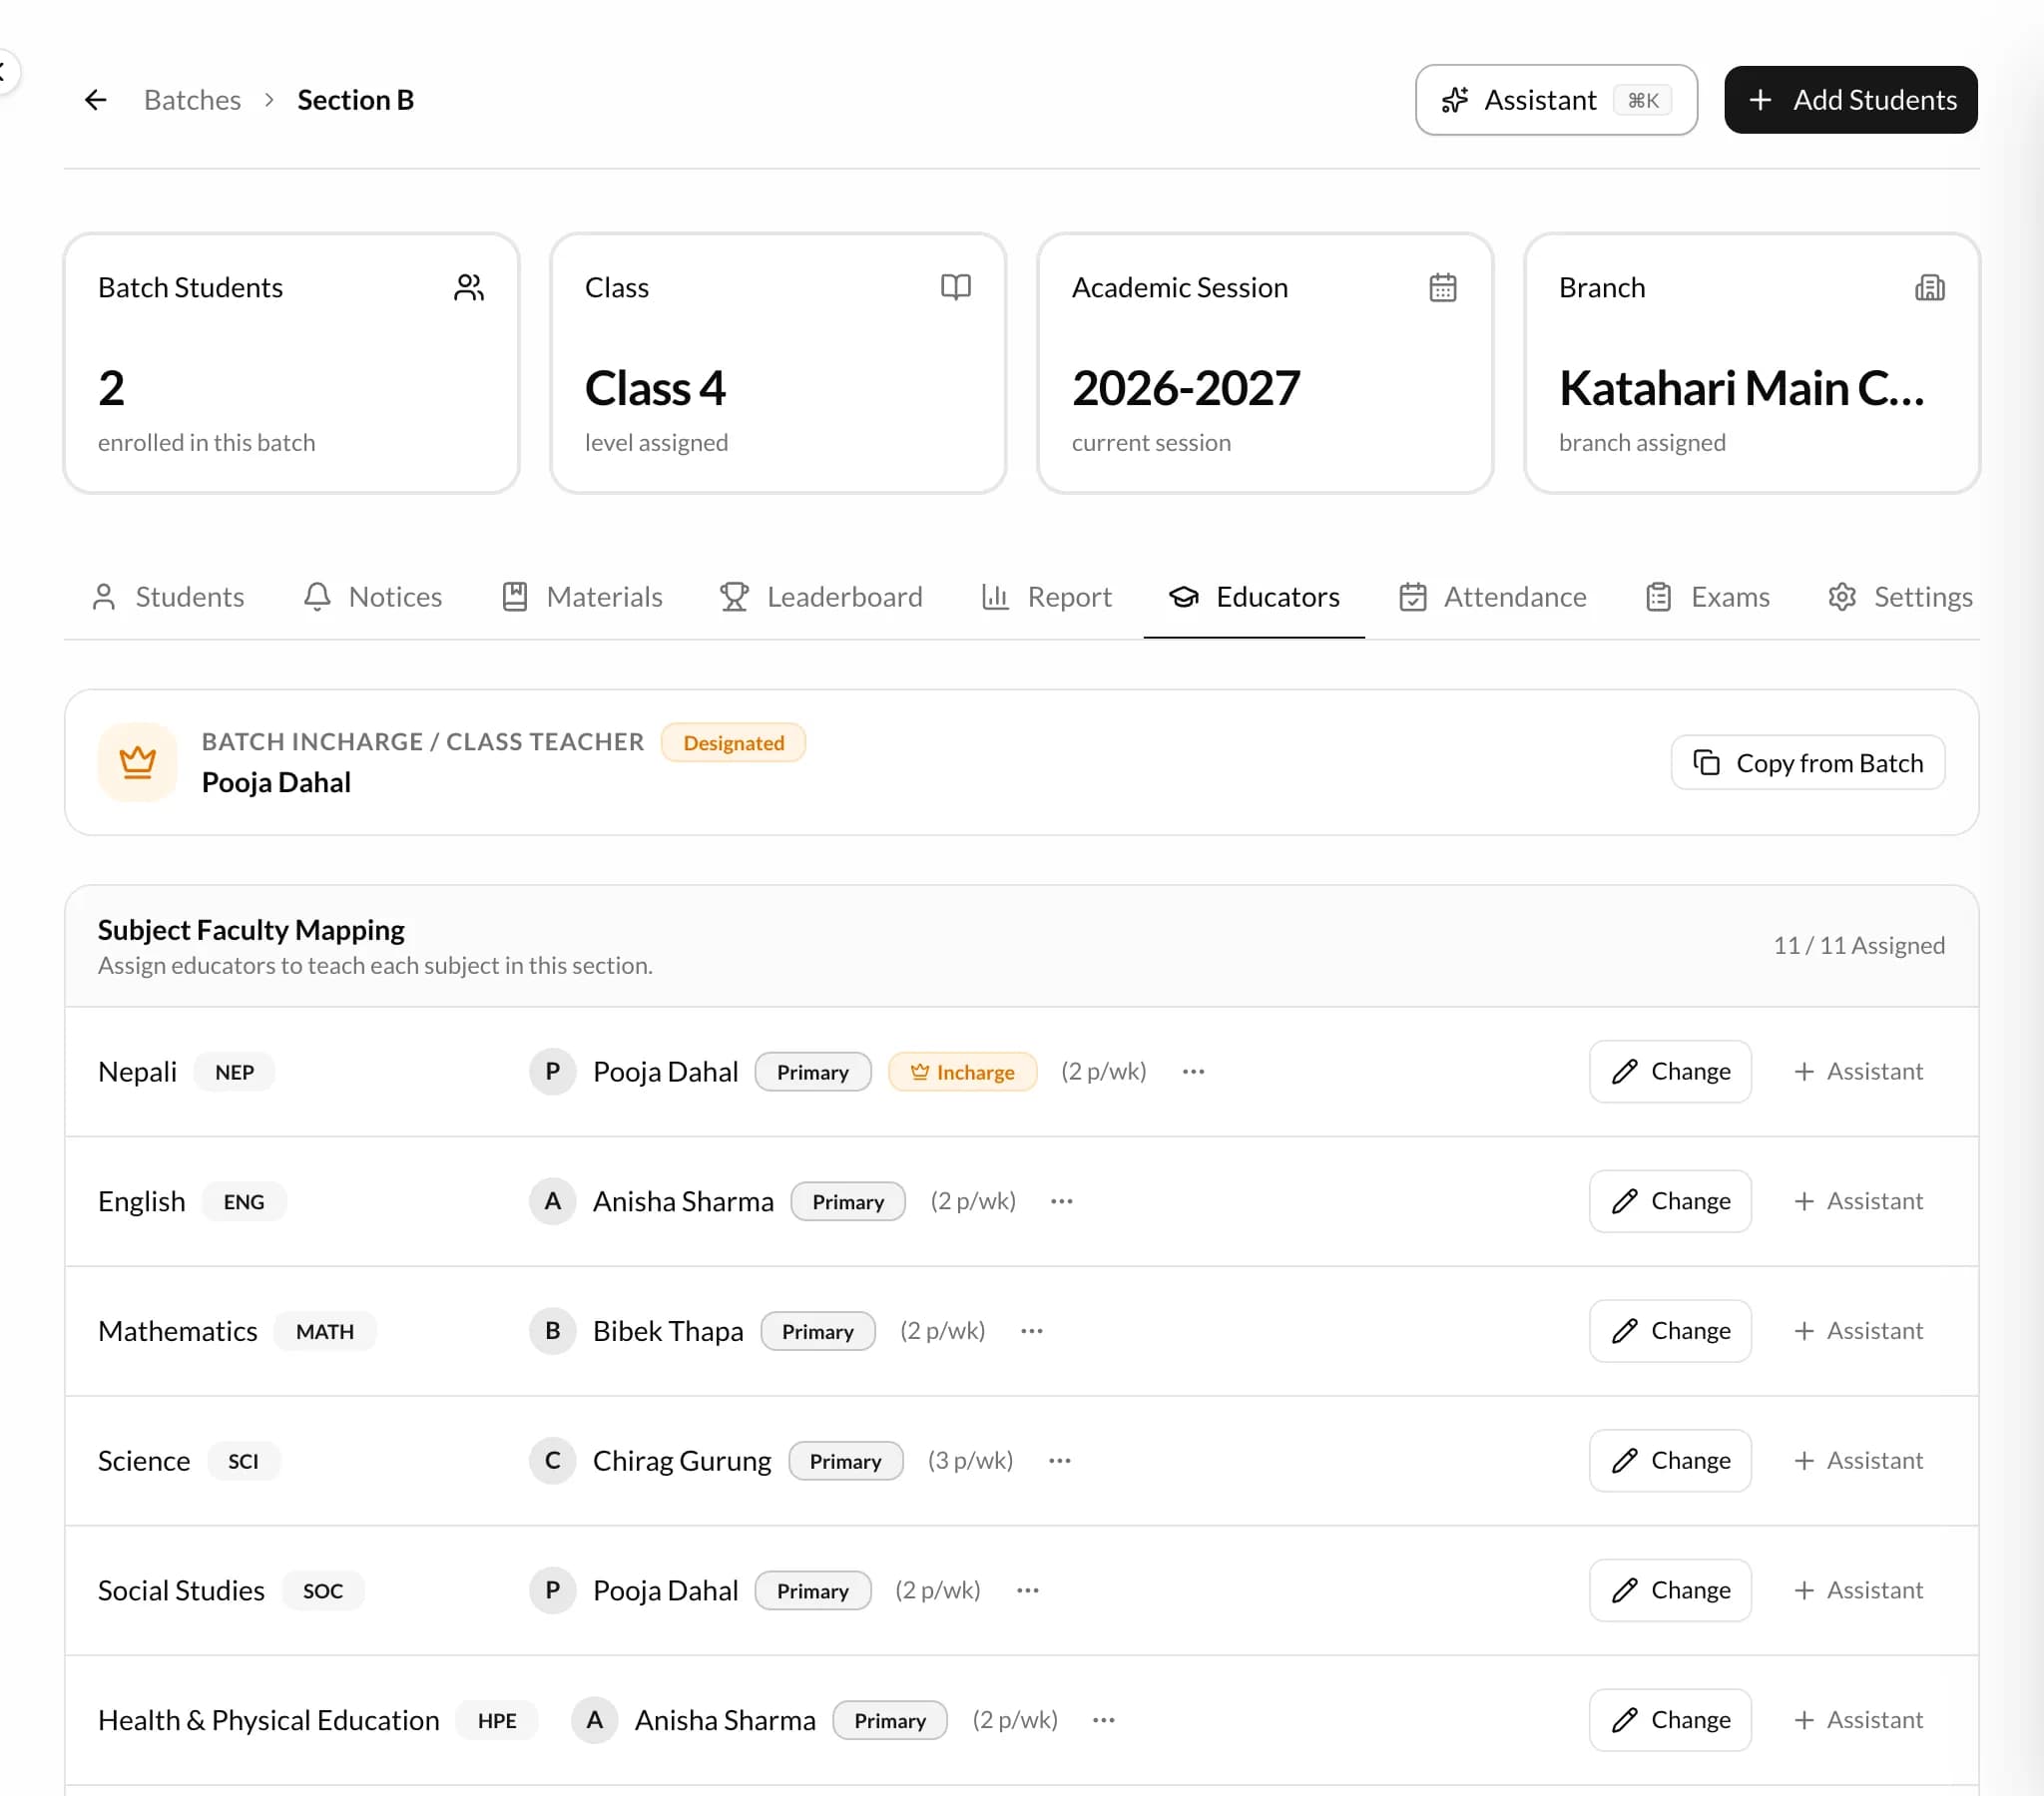
- 1The section's Educators tab
- 2Each subject and its teacher. Assign Faculty when there is none, Change to edit
- 3Copy from Batch: the same teachers as another section of this class
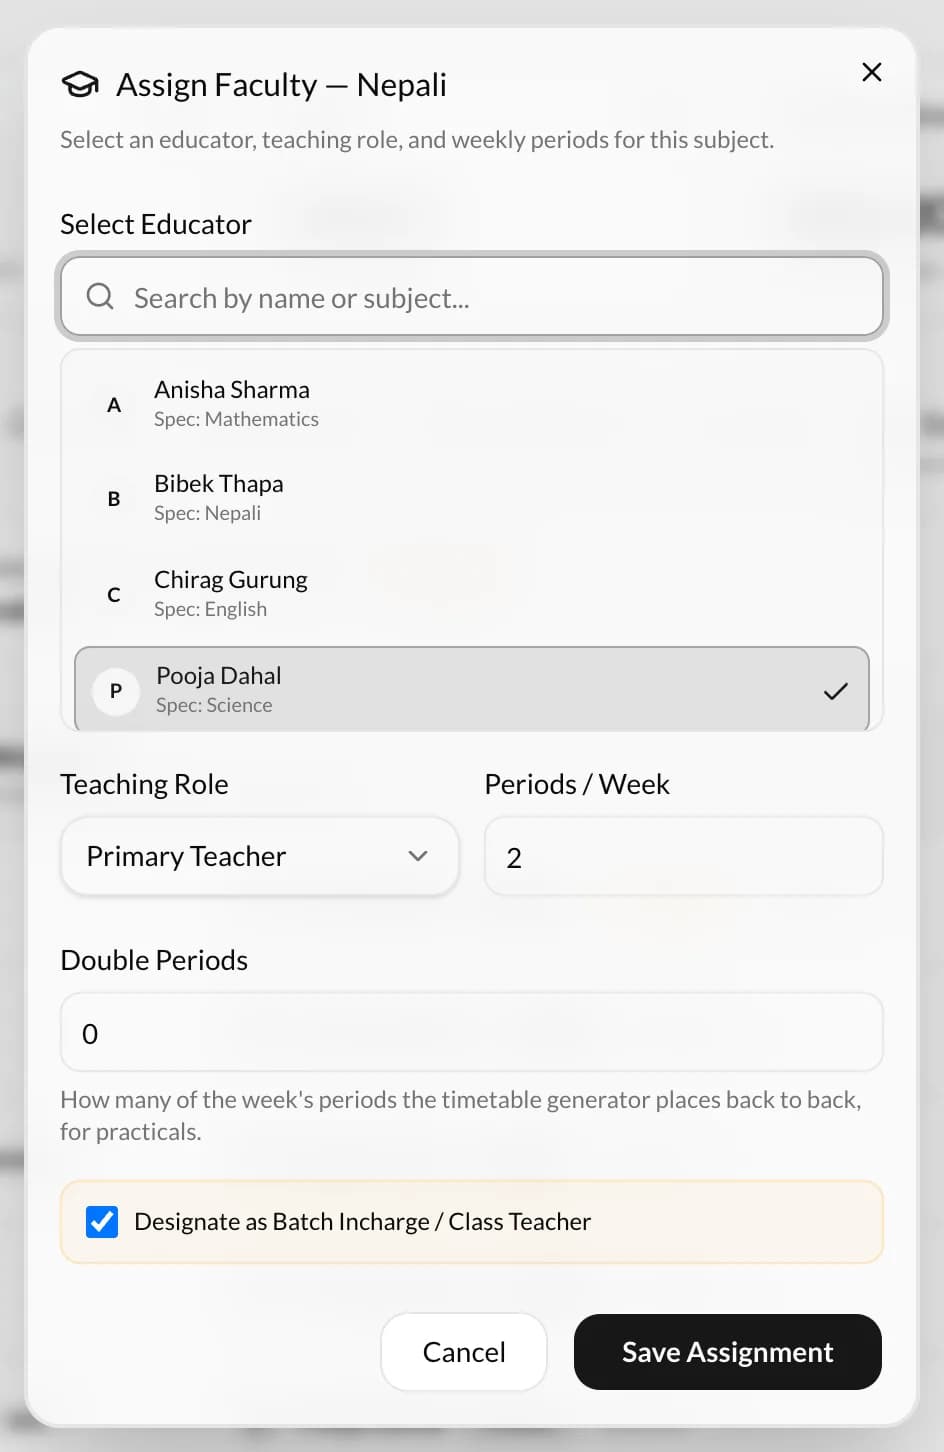
- 1The teacher
- 2Teaching Role: Primary Teacher is the one the timetable uses
- 3Periods / Week: the real number for this subject
- 4Double Periods: how many come as two back to back
Periods / Week shows 5 until someone changes it. Set the real number for every subject: the generator places exactly that many, and they must fit in the week.
Step 2
Set the period times
Roster → choose the class and section → Configure Day SlotsPick a class and a section at the top of the Roster and press Configure Day Slots. On 1-Click Generator, choose the days the school runs, the start time, how long a period is, how many periods there are and where the breaks fall, then press Generate Daily Structure.
Each section needs its own period times. Set one, then for the others open Configure Day Slots and use Copy from Batch. The generator's Check screen can also copy one section's times to another.
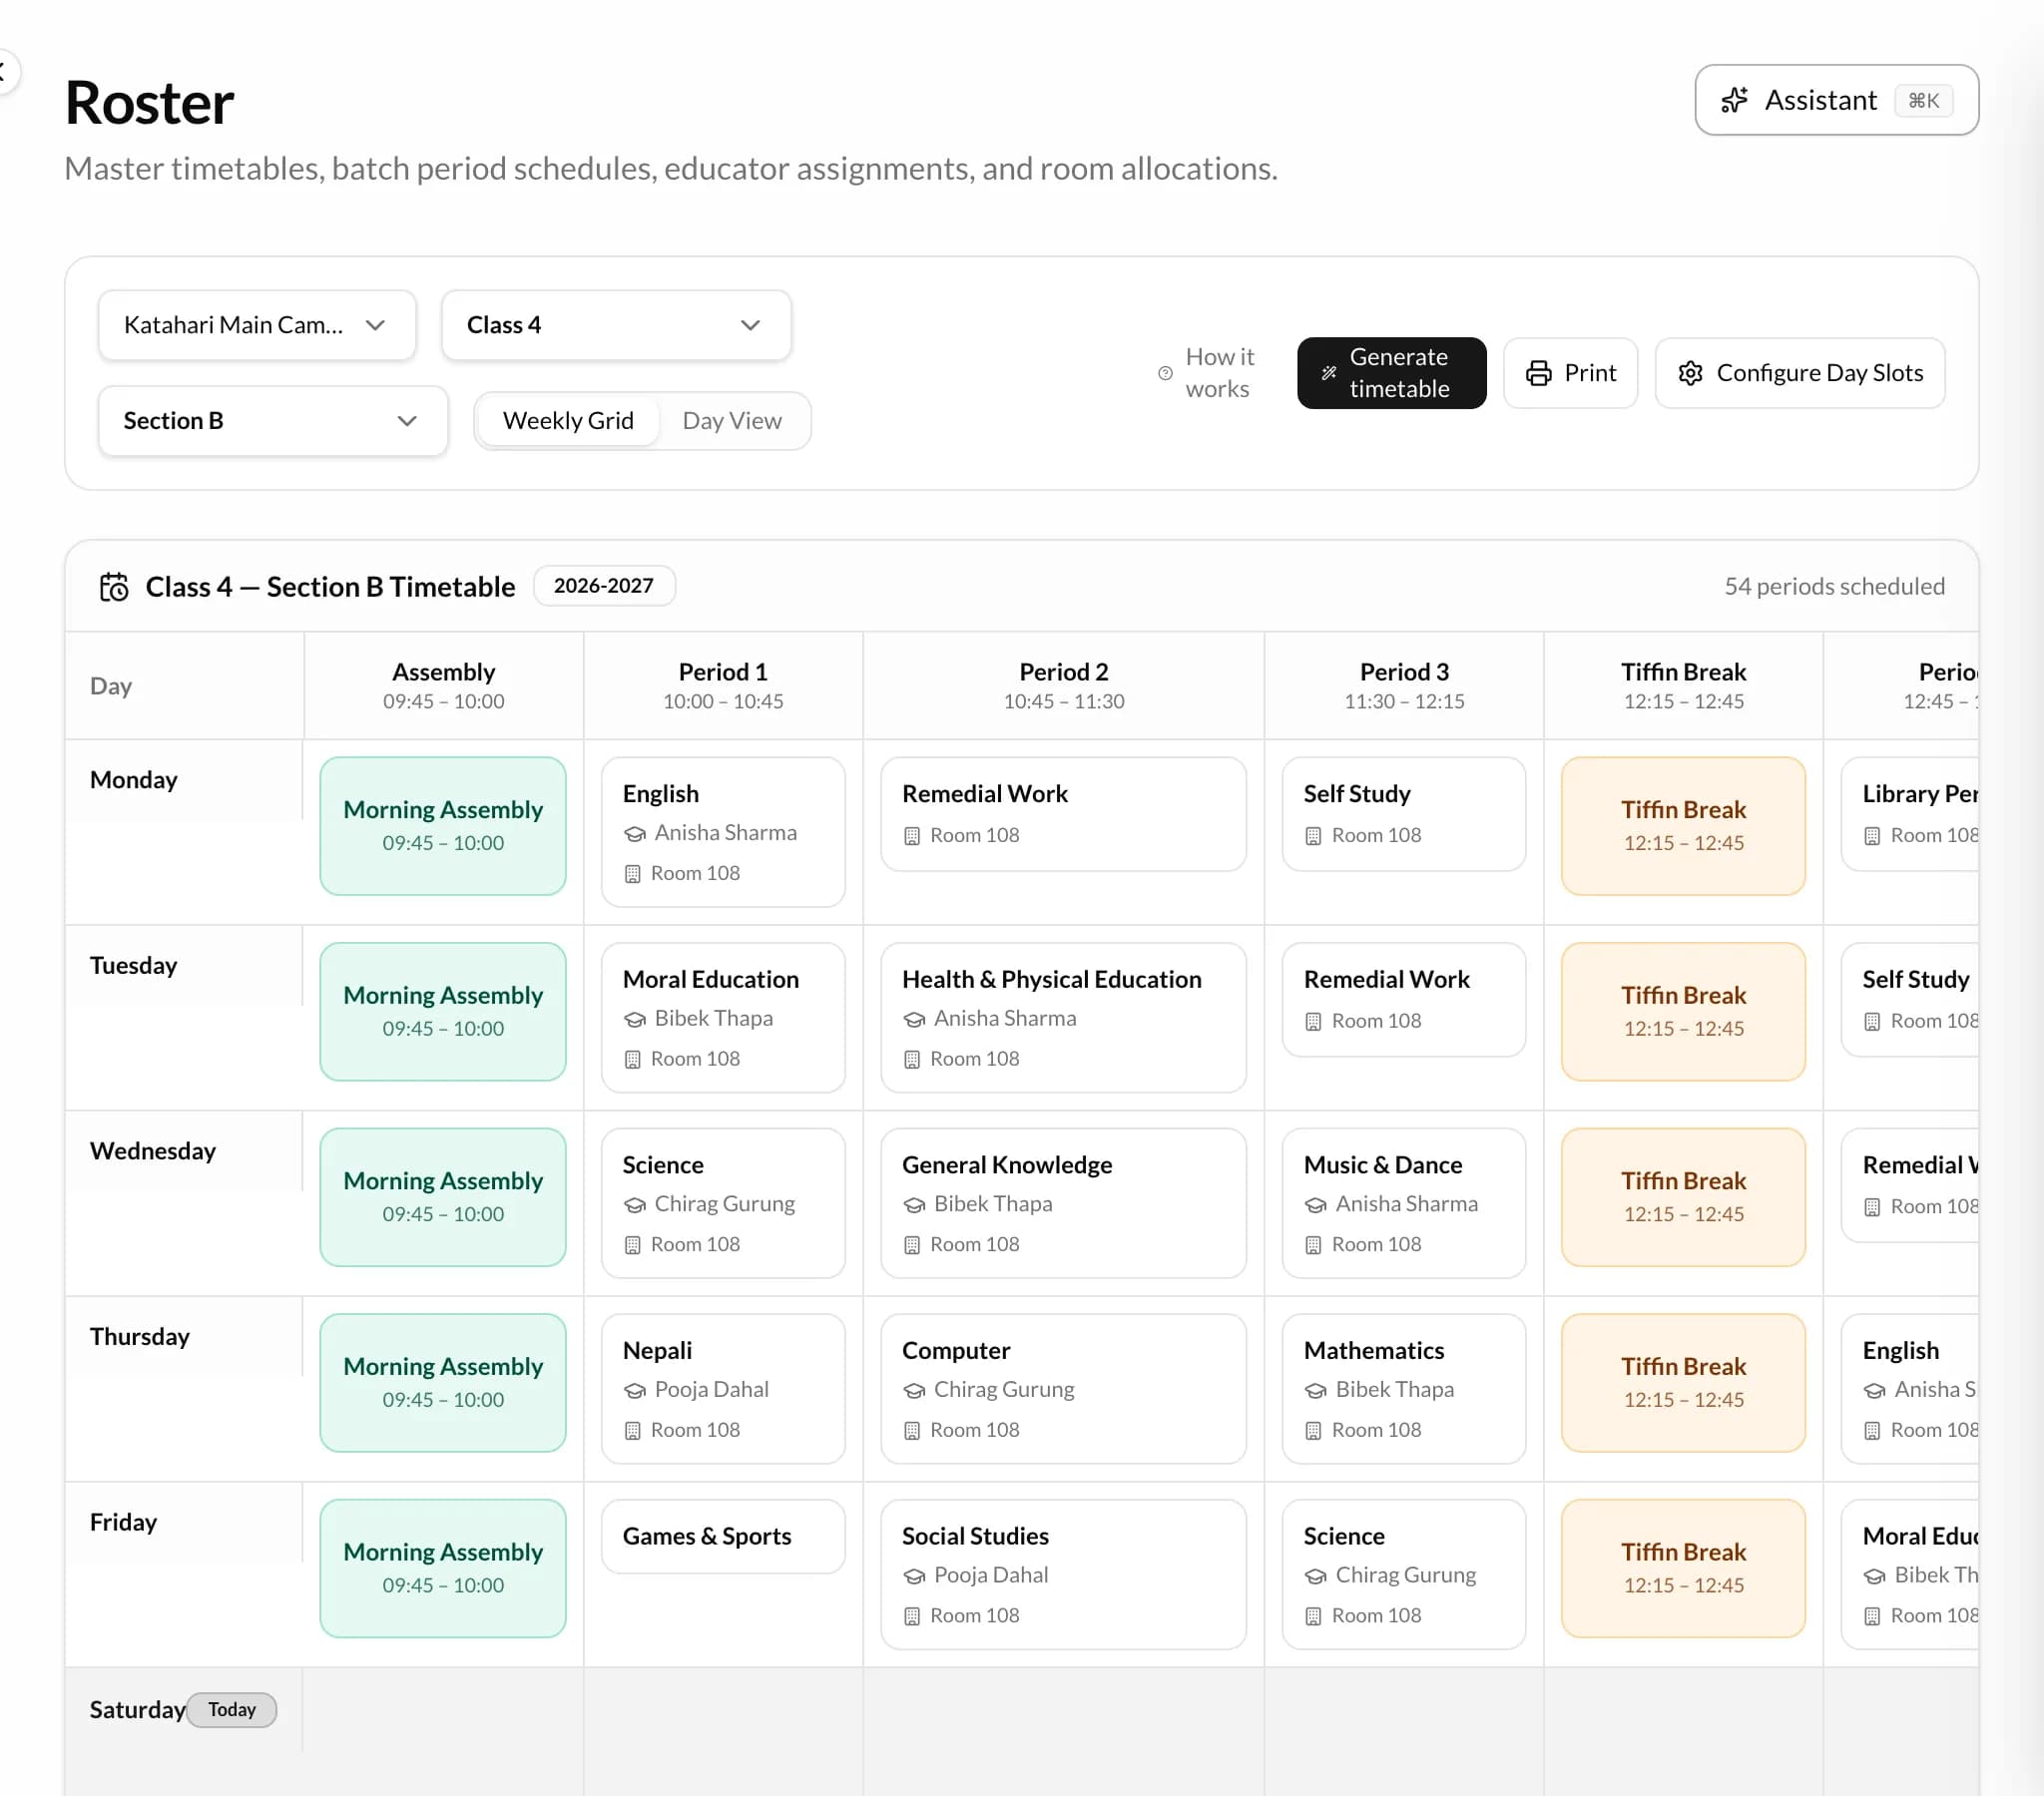
- 1Choose the class and the section
- 2Configure Day Slots: this section's period times
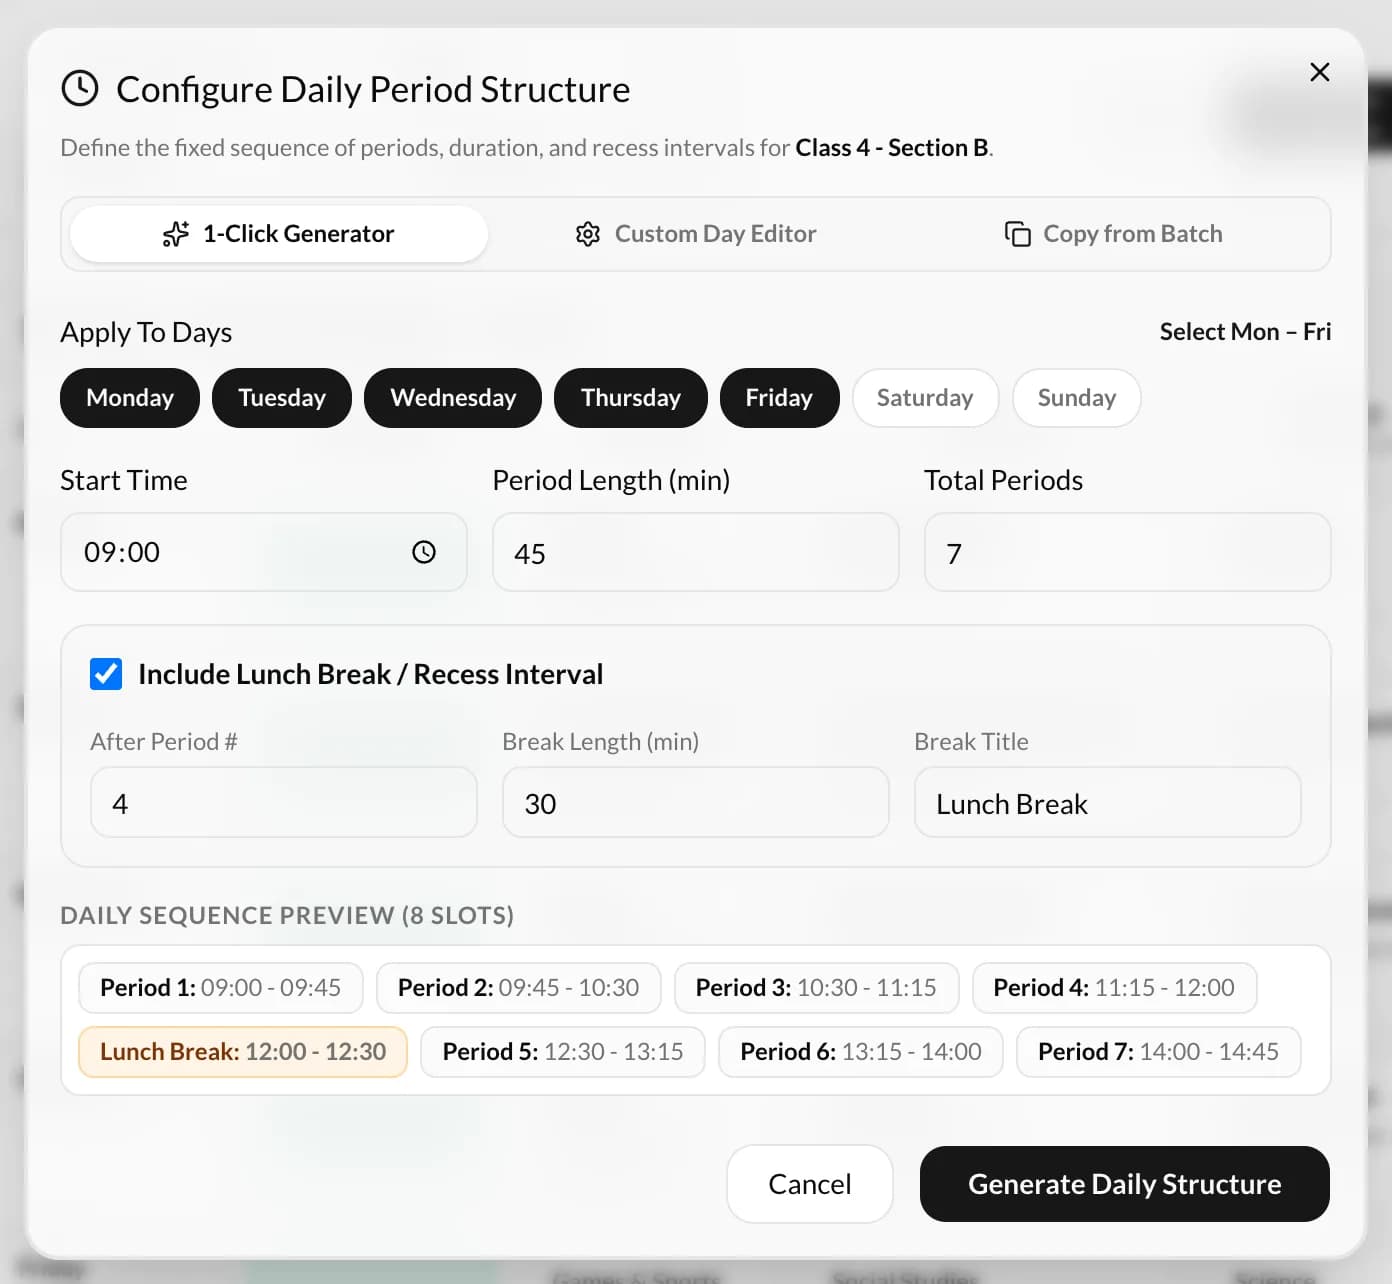
- 11-Click Generator
- 2The days the school runs
- 3Start time, period length and how many periods
- 4Breaks: after which period, how long, and their name
- 5Copy from Batch: the same times as another section
- 6Generate Daily Structure saves the times
A day you leave out, such as Saturday, gets no periods.
Step 3
Generate the timetable
Roster → Generate timetablePress Generate timetable at the top of the Roster. Five short screens follow, and nothing is saved until the last one.
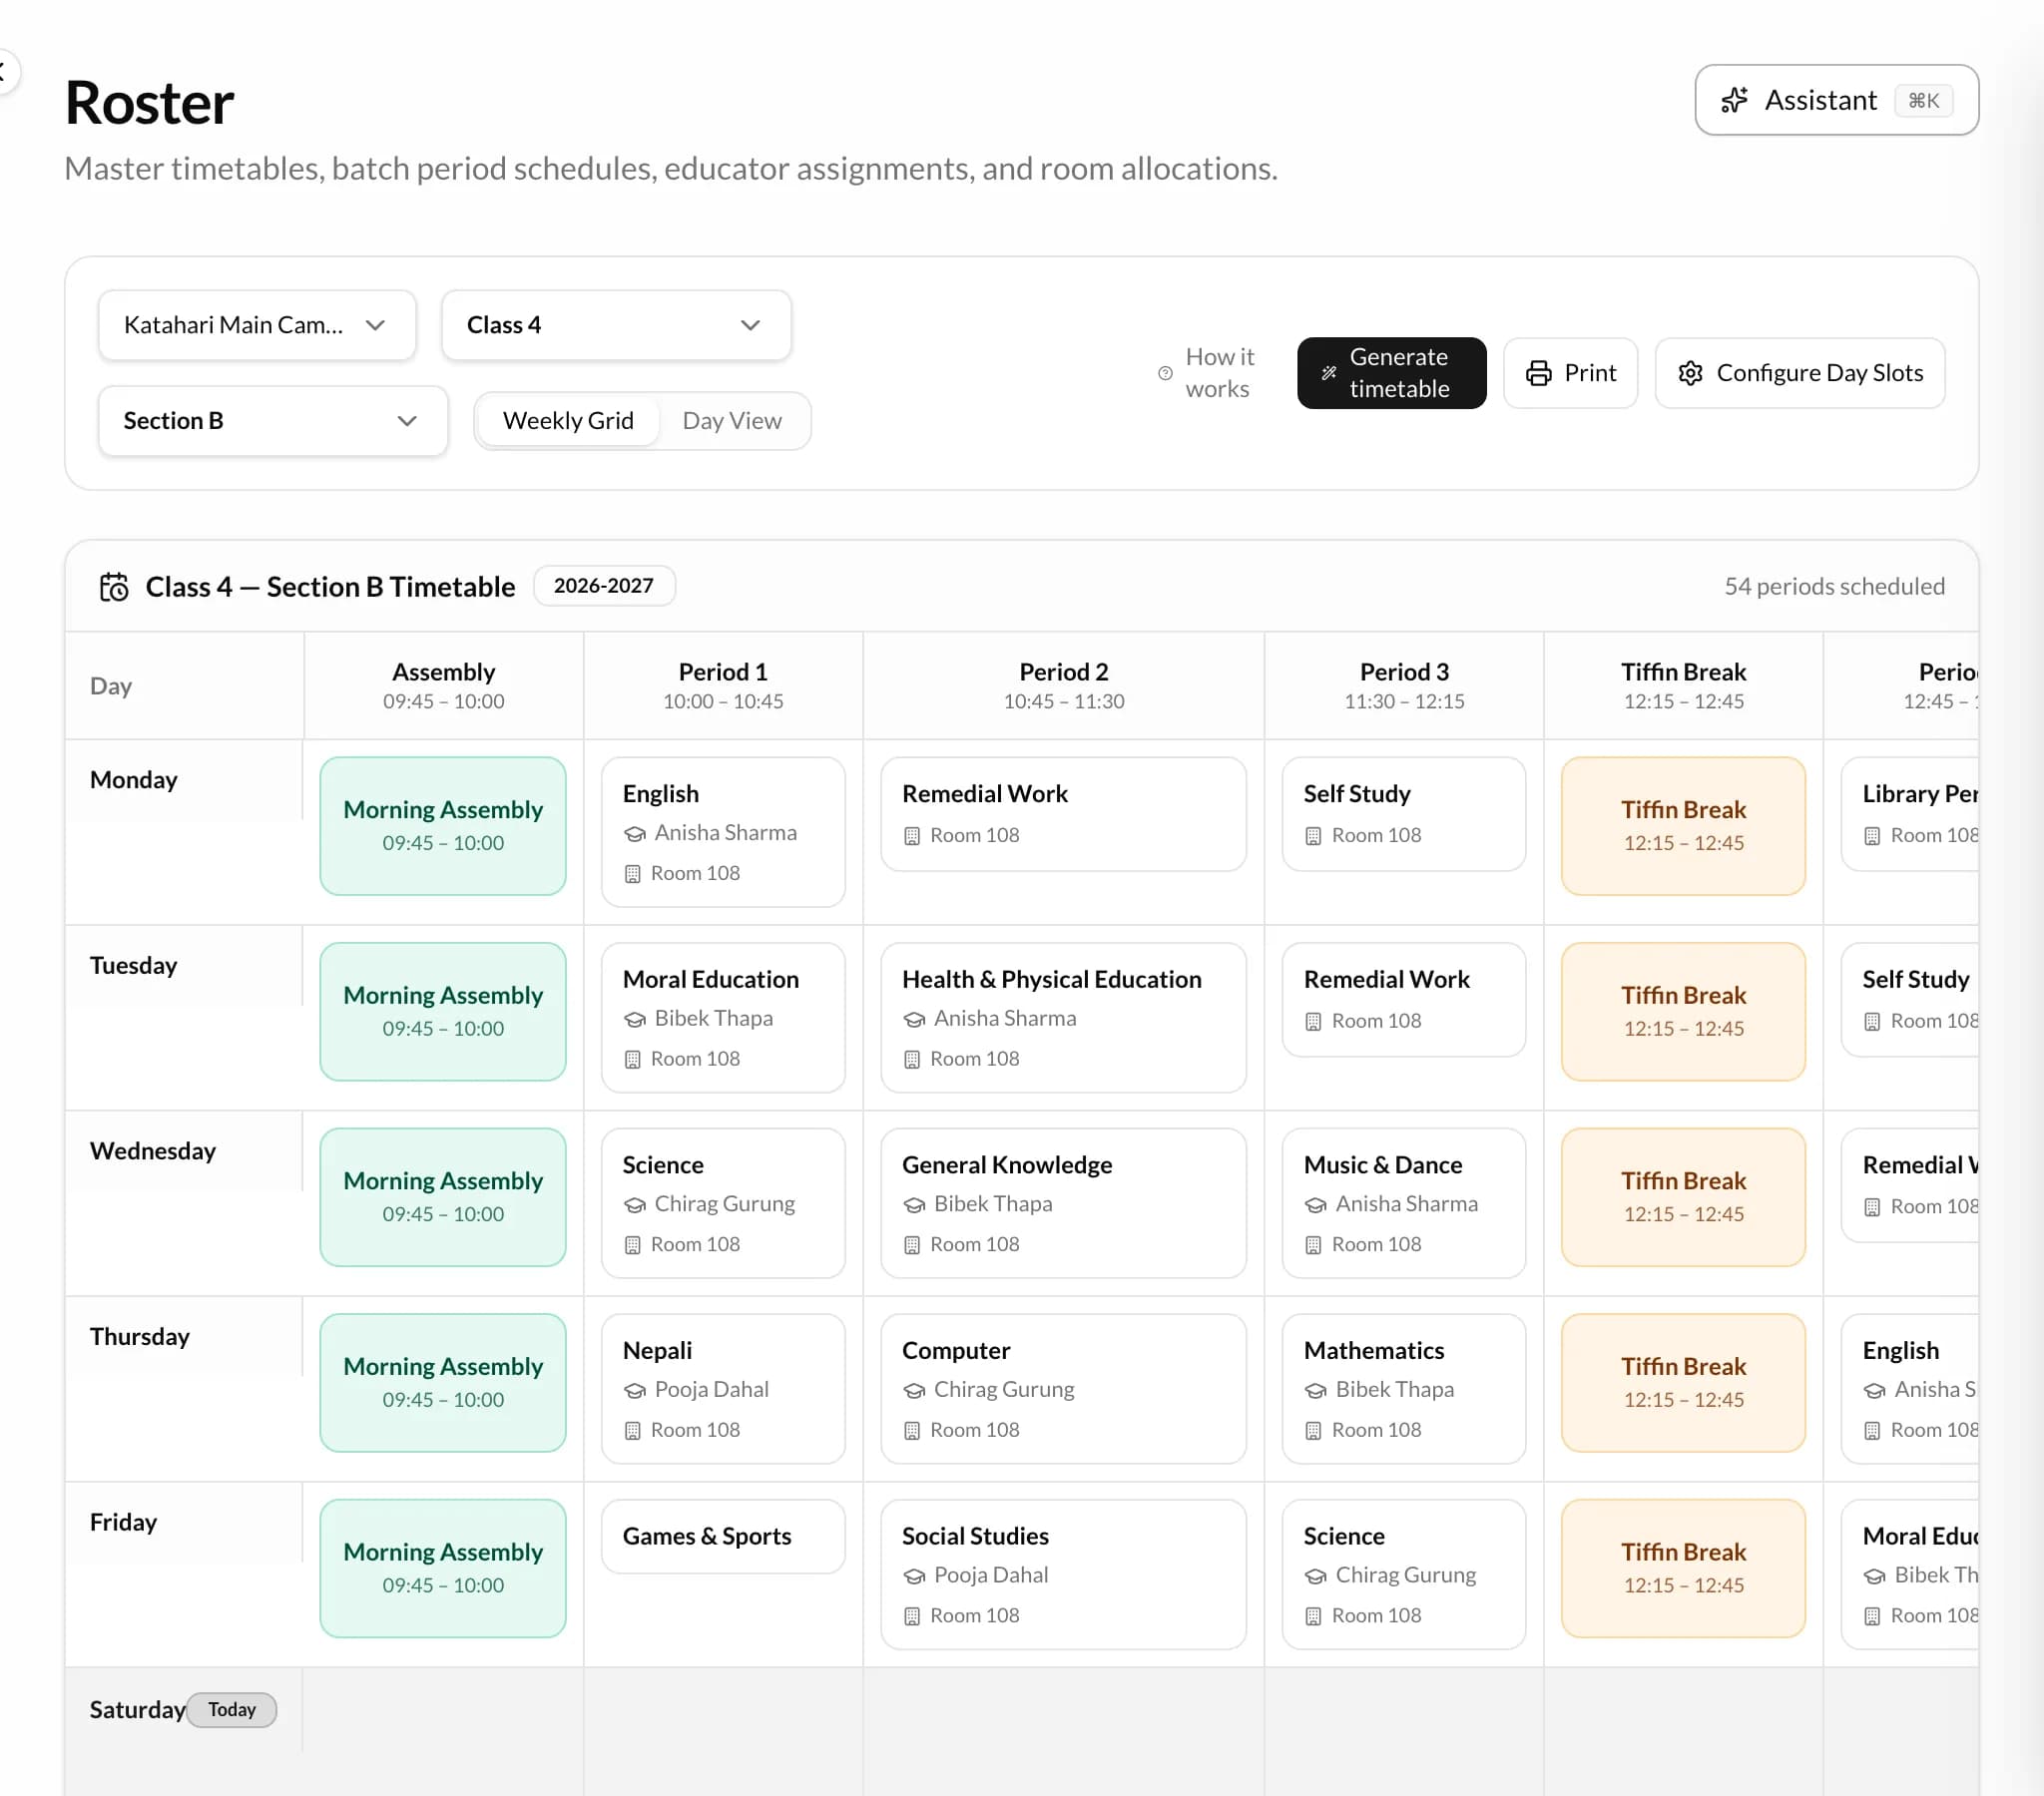
- 1Generate timetable
1.Sections
Tick the sections to arrange, or Select every section. Each one shows the periods its subjects need against the periods its days have.
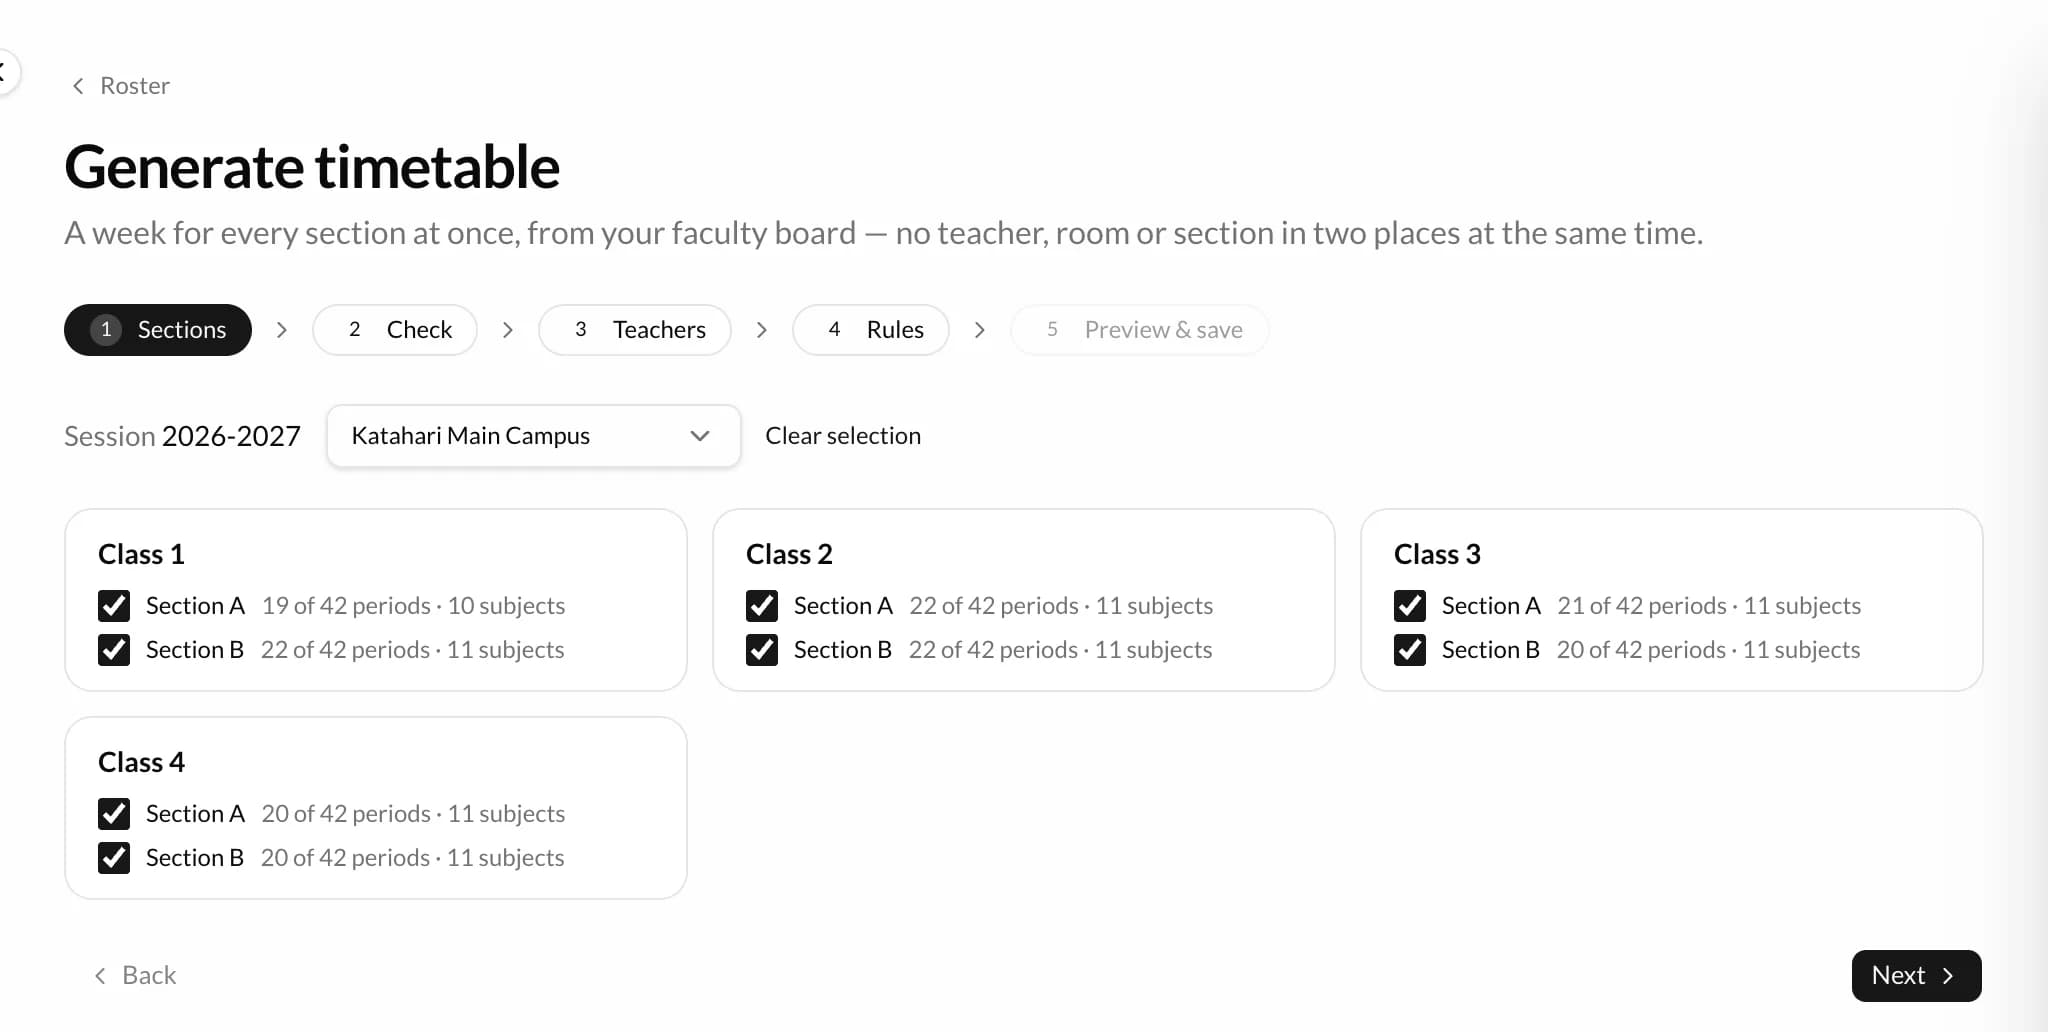
- 1The five screens, in order
- 2The branch
- 3Tick the sections to arrange. Each shows the periods its subjects need, of the periods its days have
- 4Next
2.Check
Lists anything missing with the fix beside it: a subject with no teacher, more periods than the week holds, a section with no period times or no room. Most can be fixed right there.
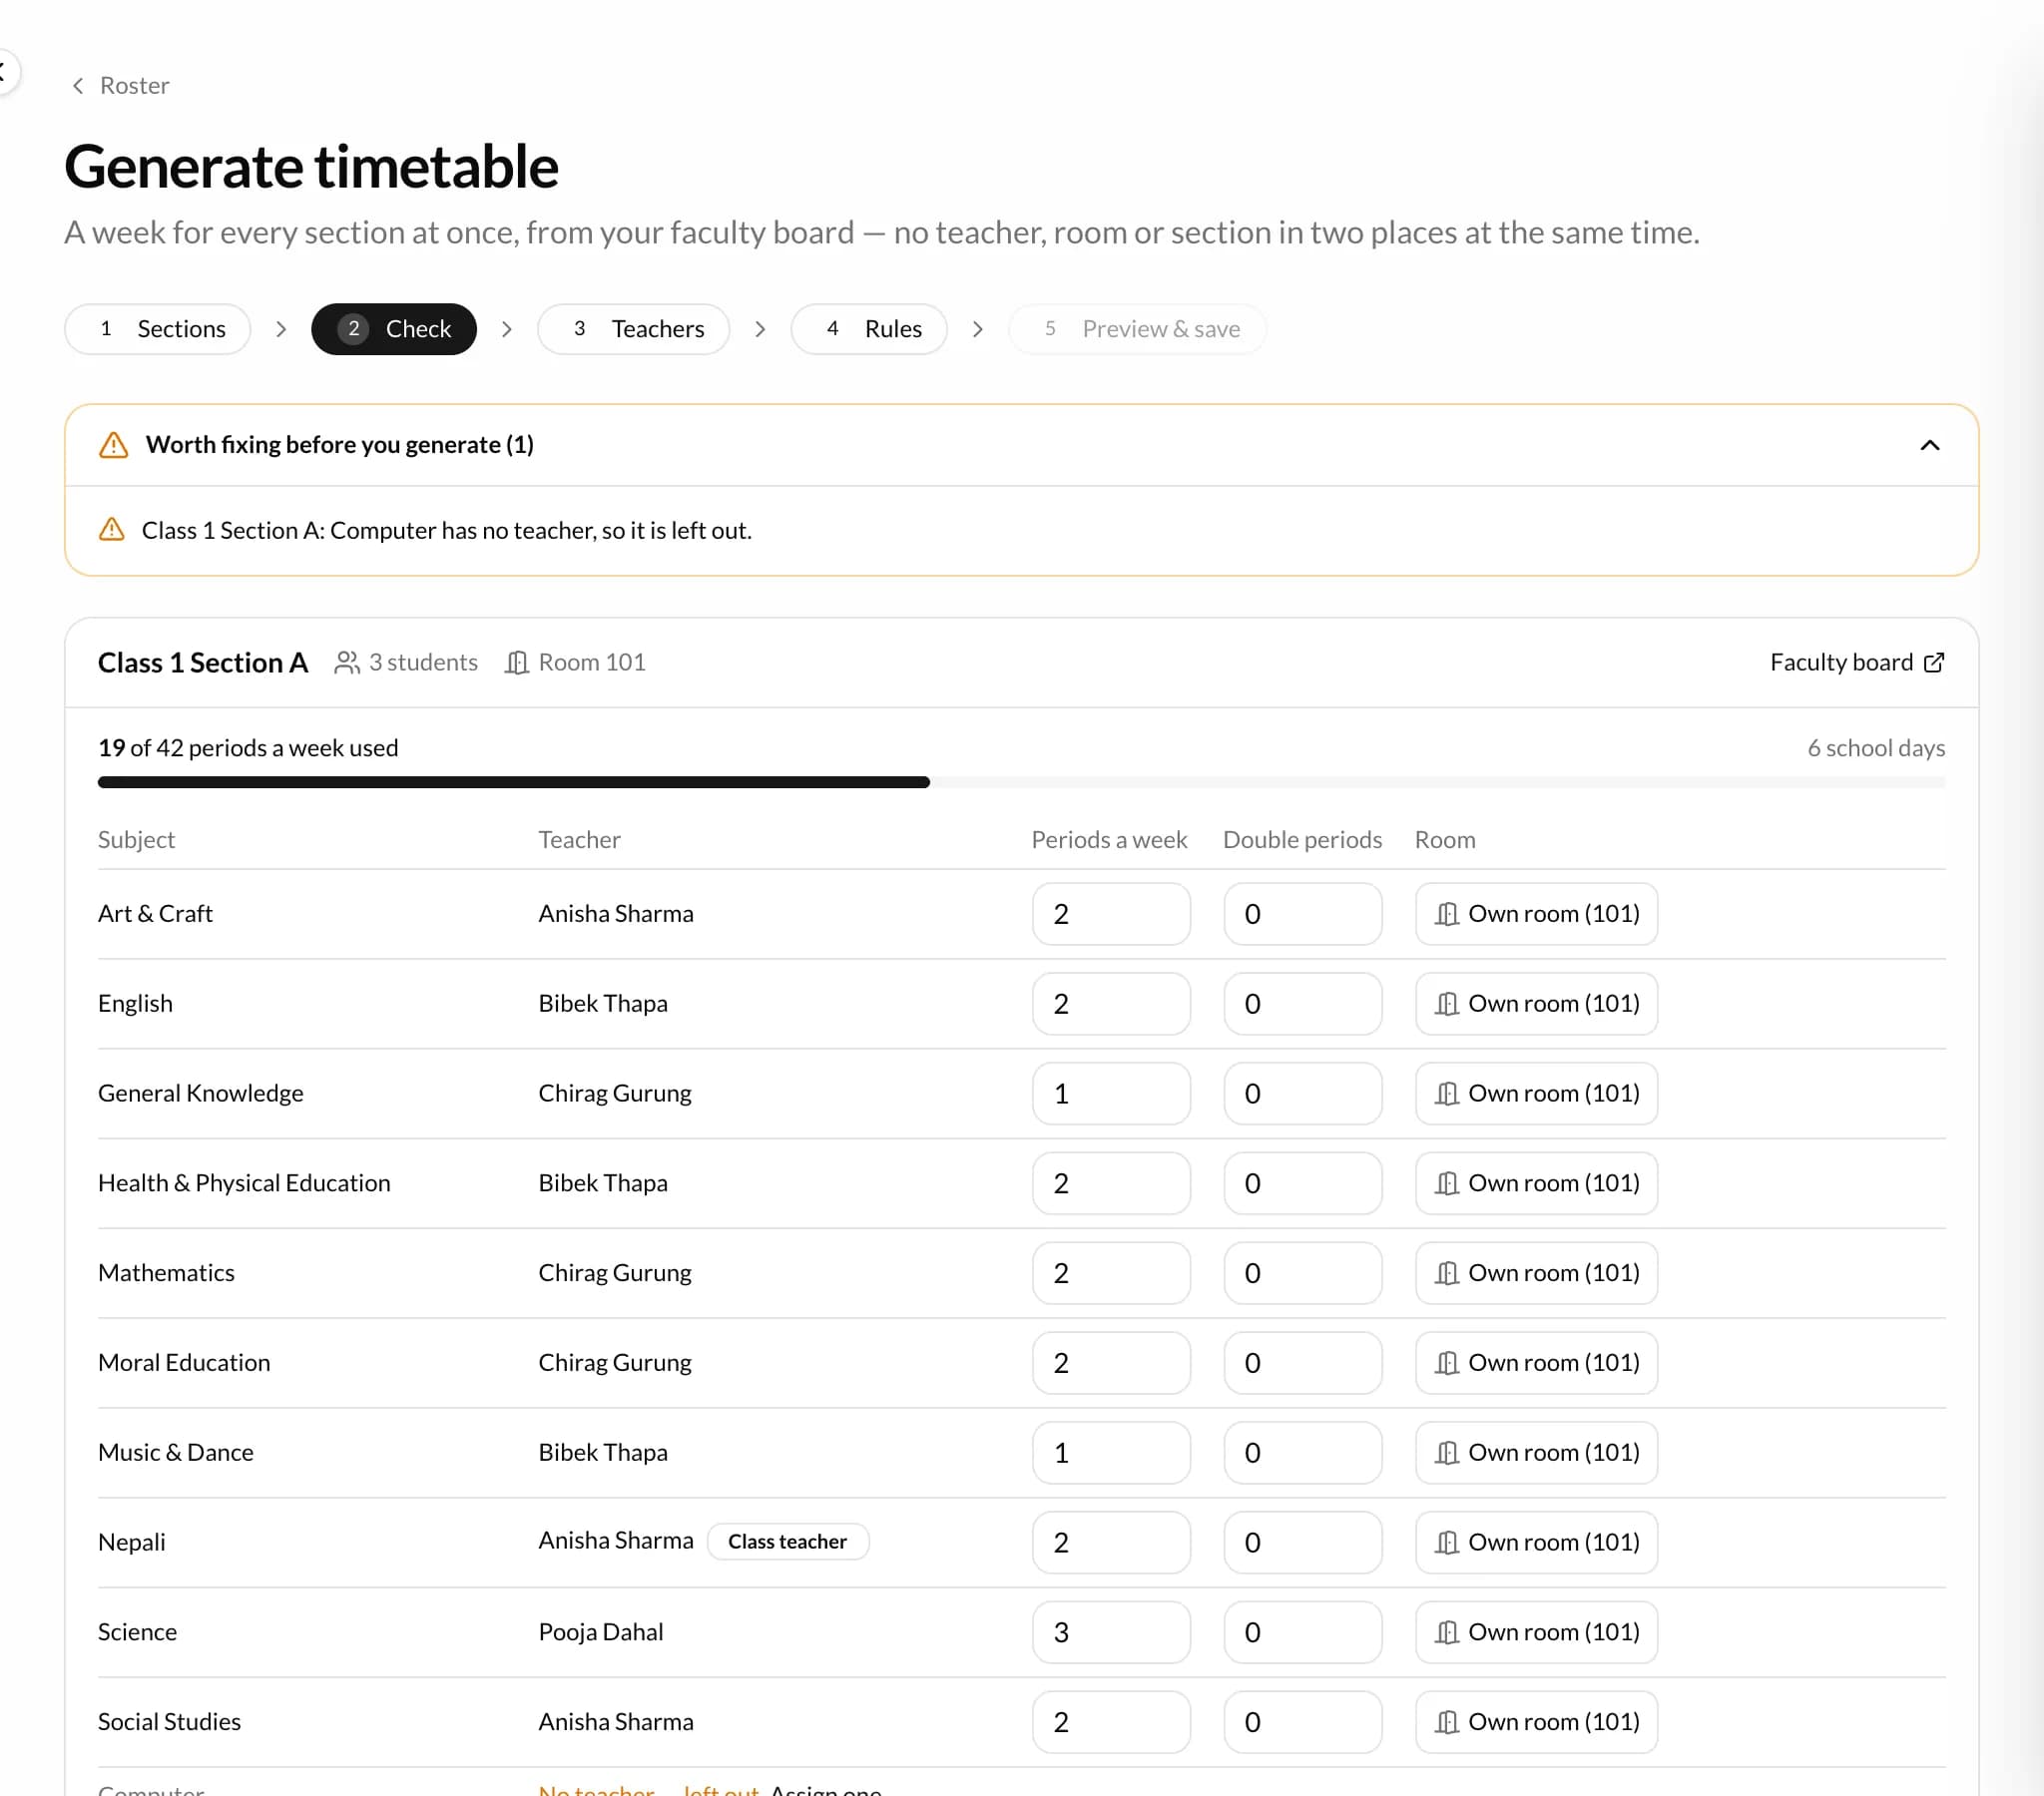
- 1Worth fixing before you generate. Most can be put right in the table below
- 2The periods this section's subjects need, of the periods its week has
- 3Periods a week and double periods for each subject, changed right here
- 4The room: the section's own room, or a lab for this subject
3.Teachers
Optional. Mark the times a teacher can't teach, such as a part-timer's mornings, and the most periods a day or in a row.
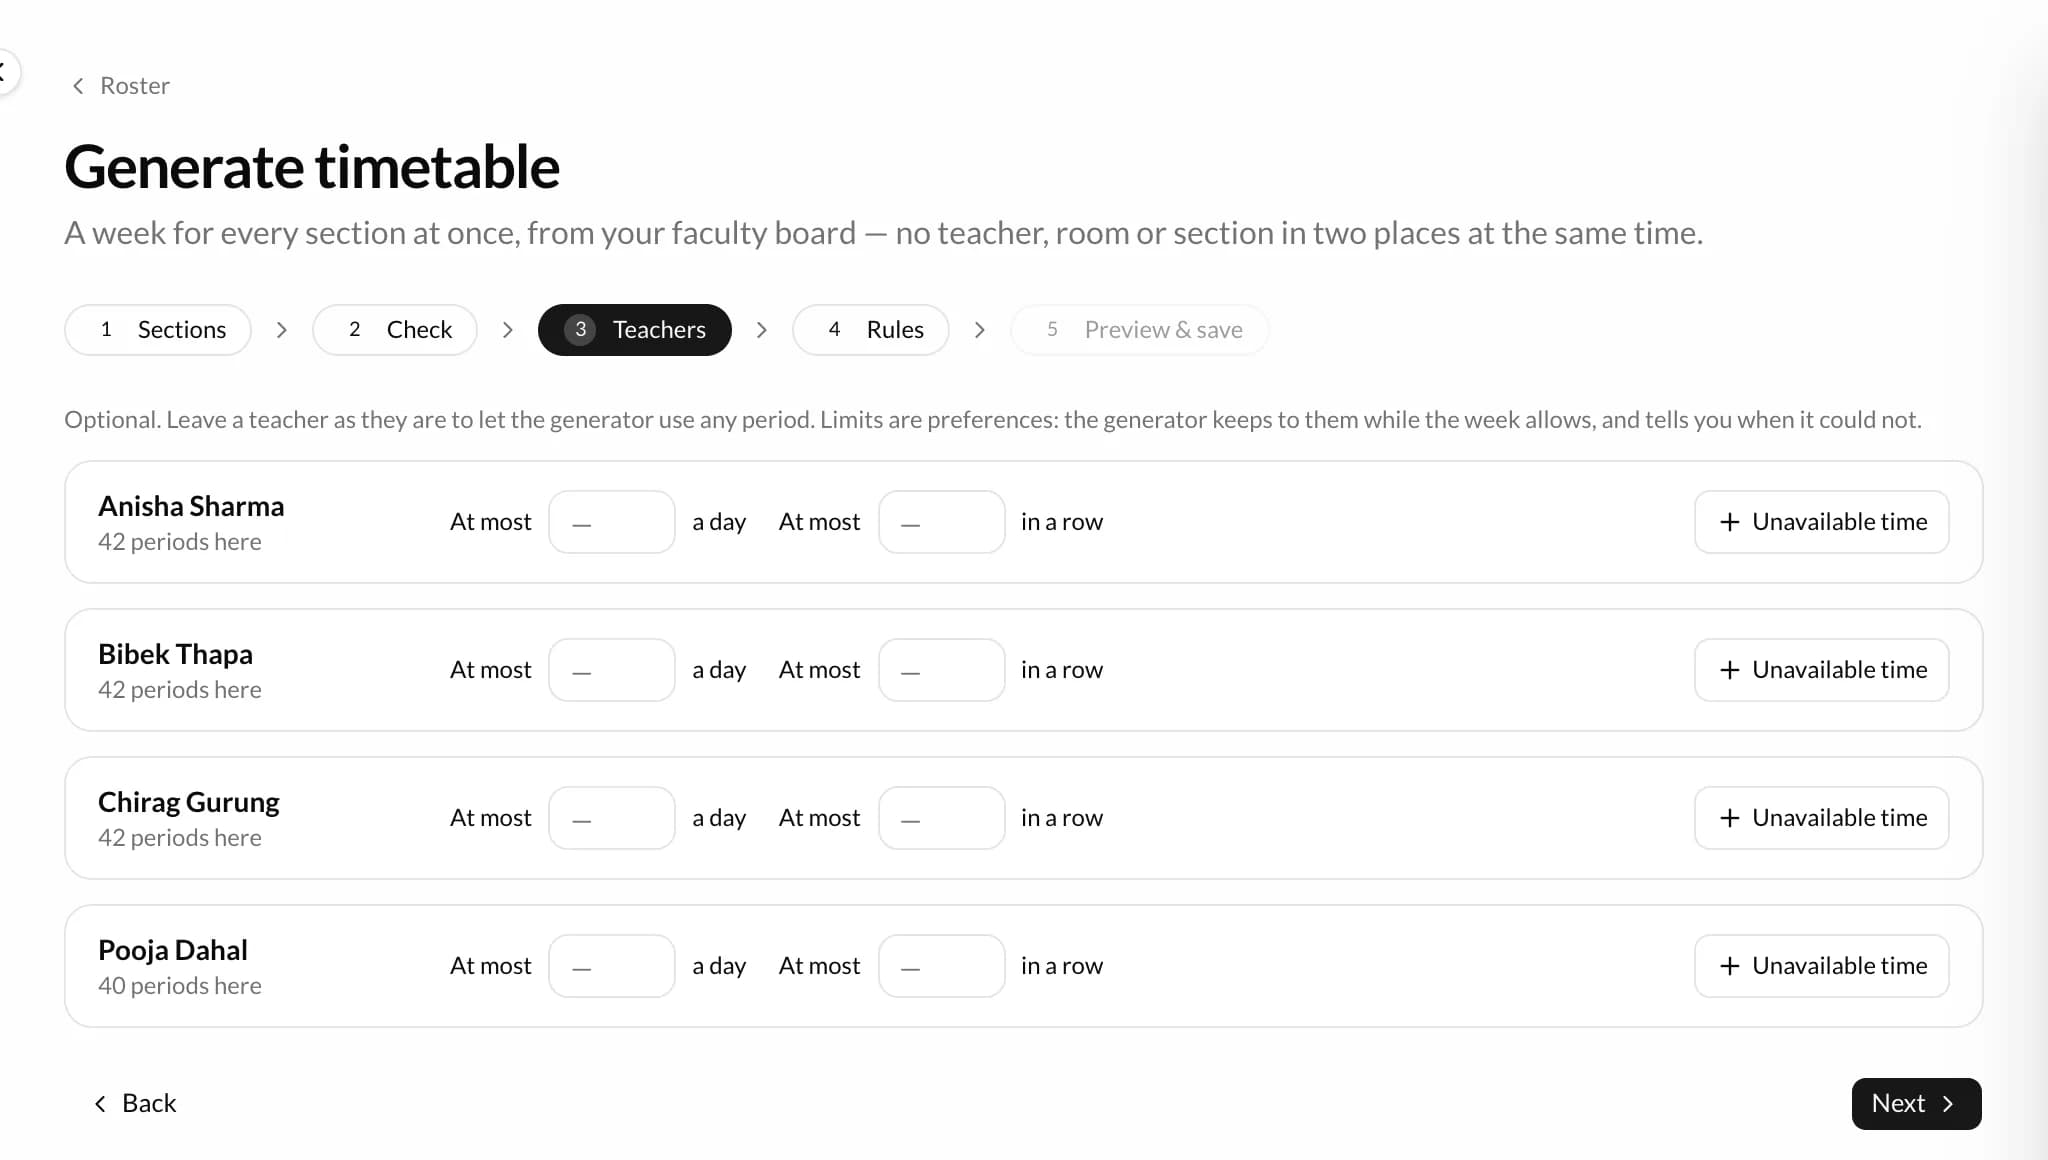
- 1The most periods a day, and in a row, for this teacher
- 2Unavailable time: when this teacher can't teach
4.Rules
Choose Replace them for a fresh timetable, or Keep them and fill the rest to keep the periods already placed. Then press Generate.
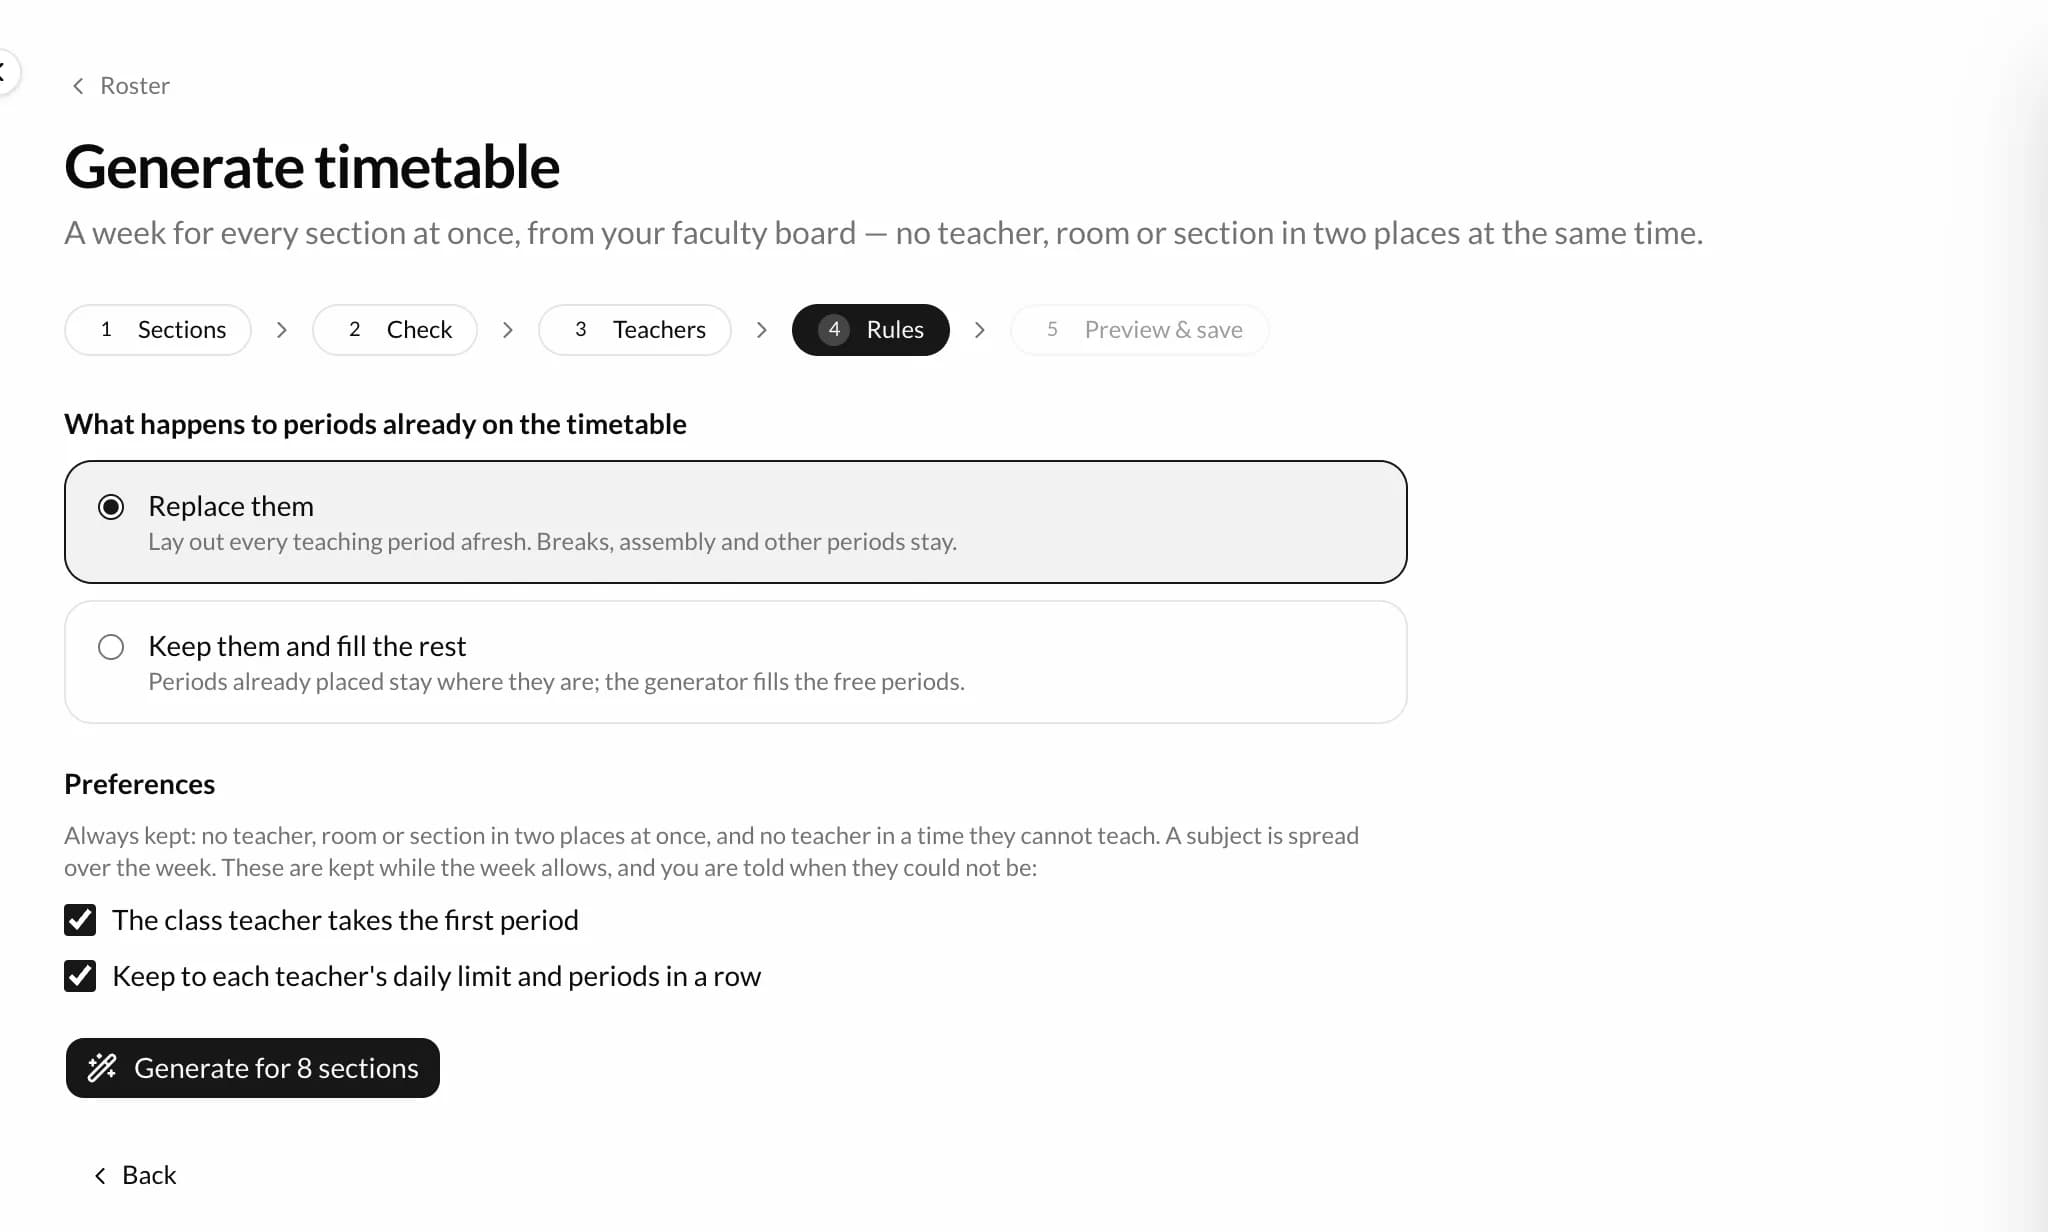
- 1Replace them, or Keep them and fill the rest
- 2Preferences, kept while the week allows
- 3Generate
5.Preview & save
See the week by section or by teacher. Click a period to swap or lock it, or try another arrangement. Then press Save timetable, and tell the teachers whose week changed with a notification on their phone.
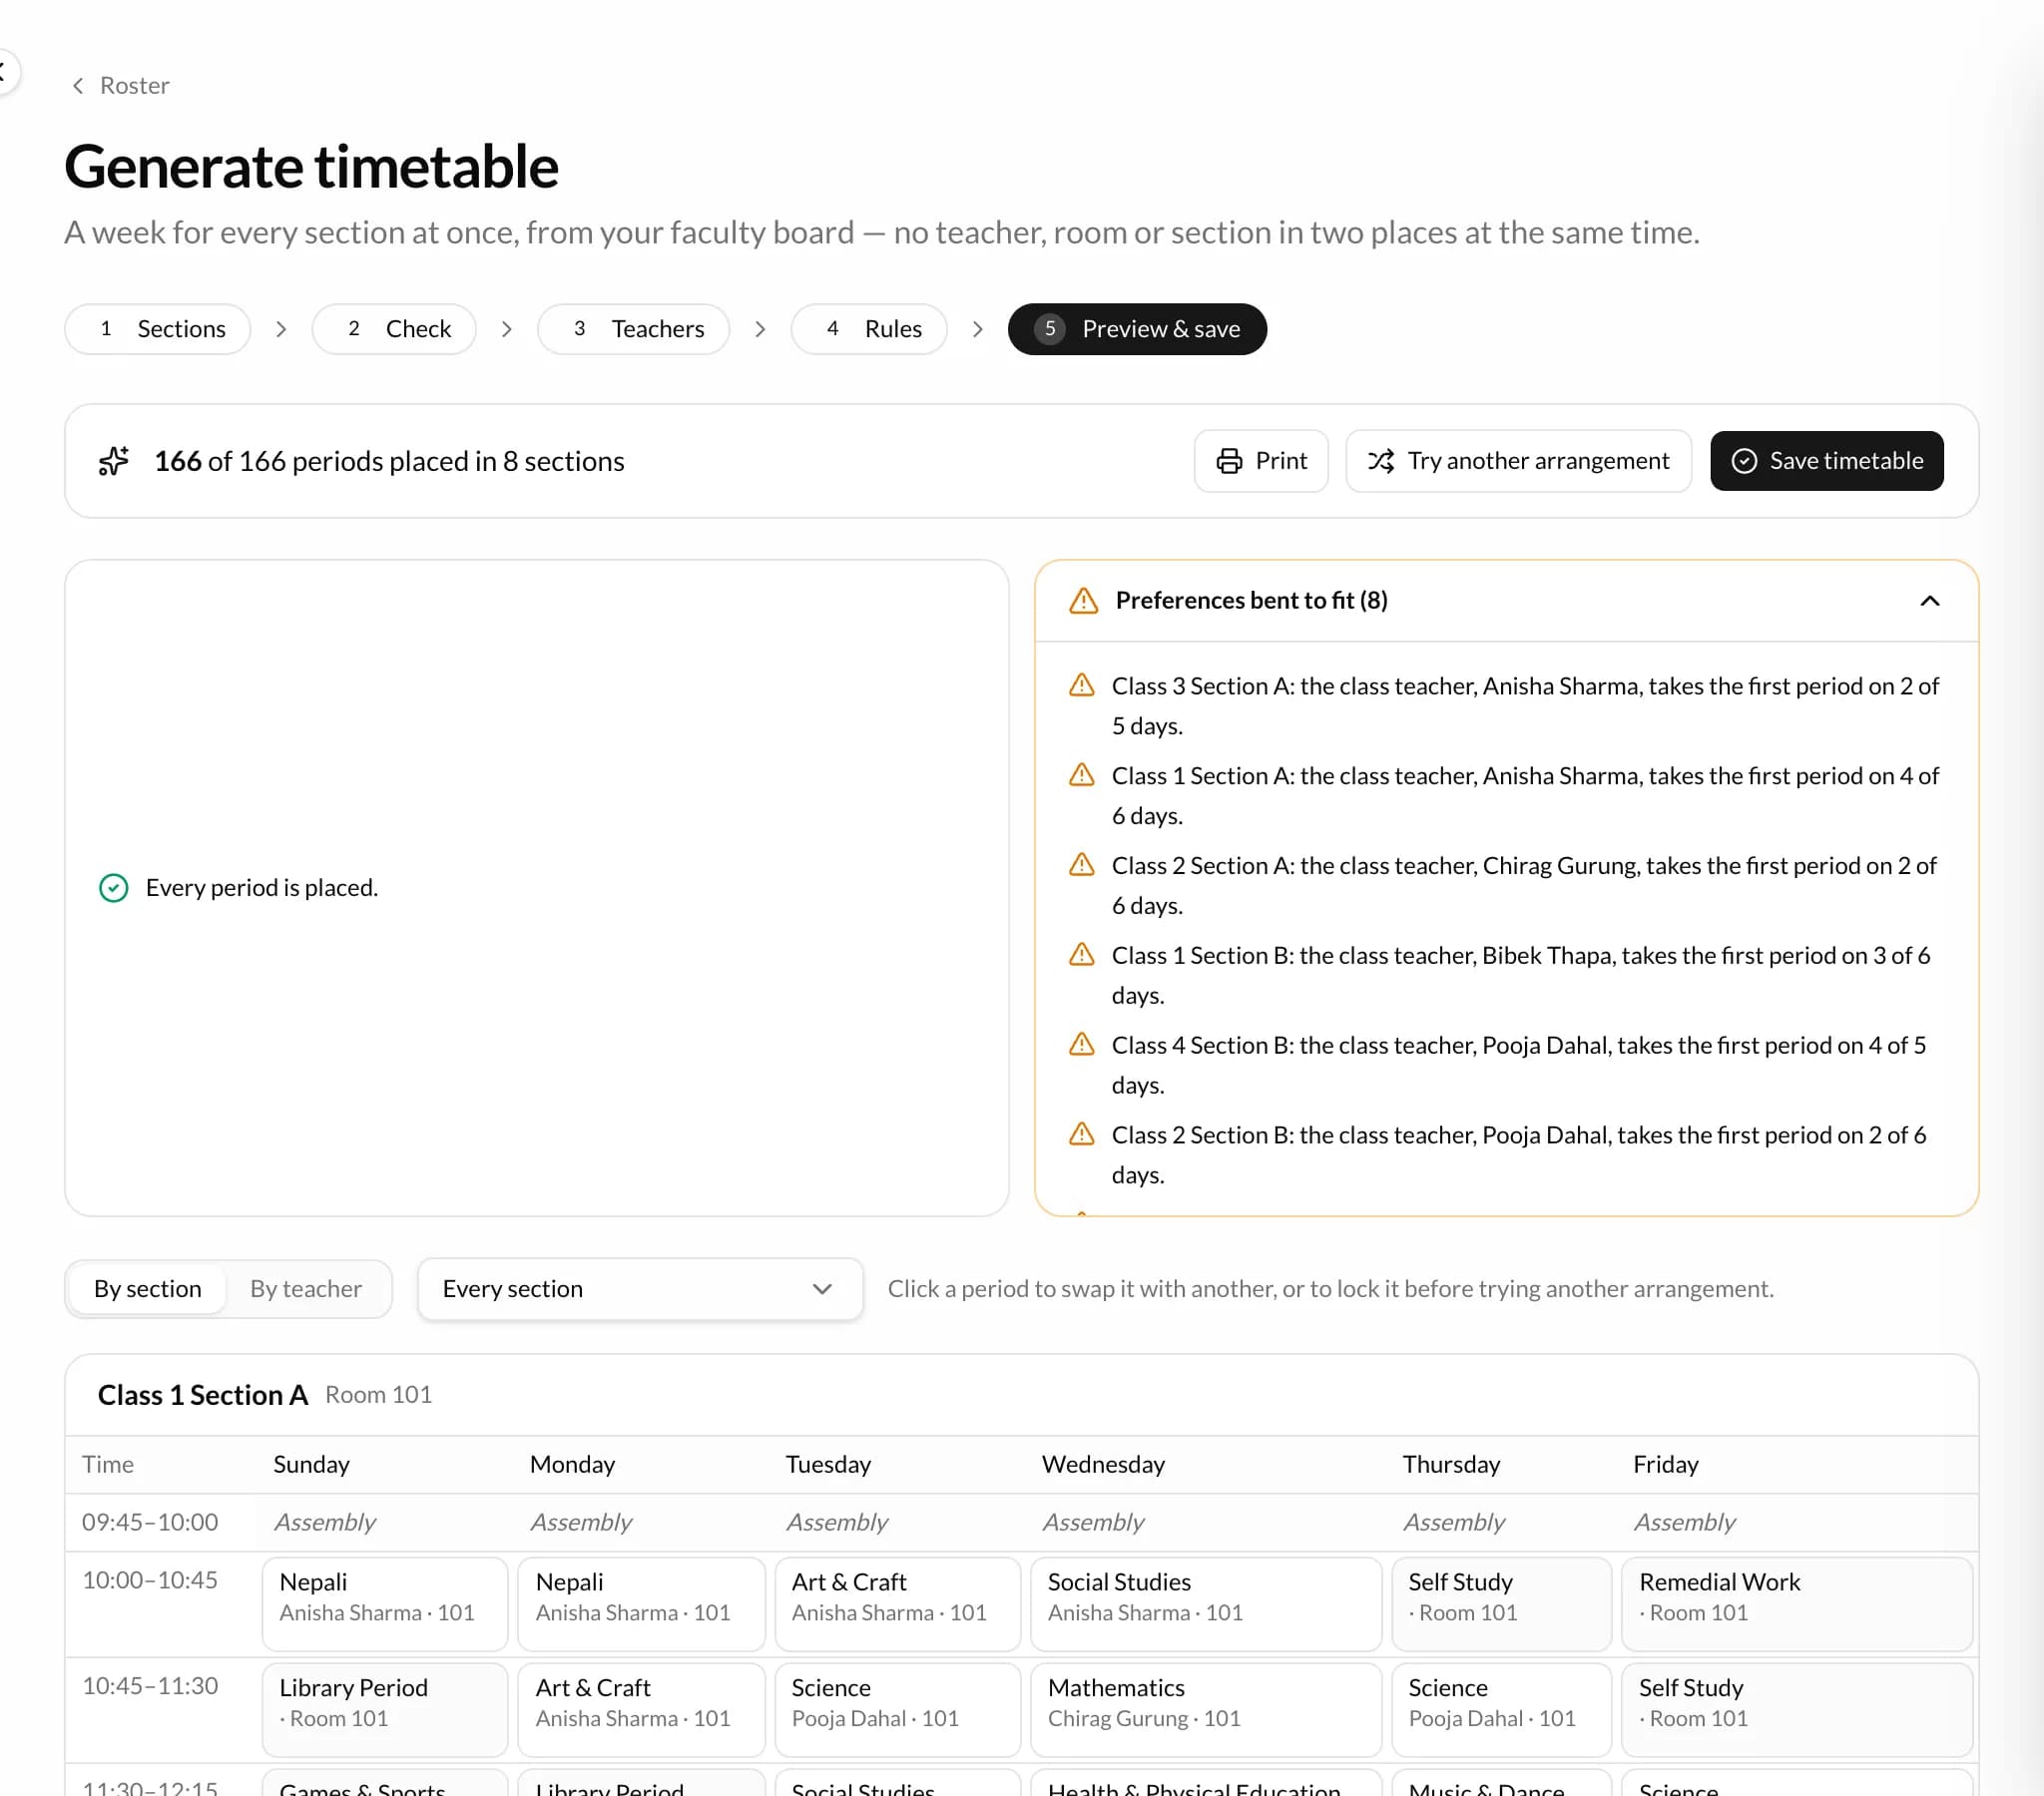
- 1How many periods were placed
- 2Try another arrangement
- 3Save timetable: nothing is saved before this
- 4What could not be placed, and the preferences that had to give
- 5The week by section or by teacher. Click a period to swap it or lock it
Changed your mind after saving? Previous timetables, on the Sections screen, has Restore the week before.
When something doesn't fit
- A section shows “no period times yet”.
- Set its period times (step 2), or copy another section's times on the Check screen.
- “… has no teacher, so it is left out.”
- Assign a teacher to that subject on the section's Educators tab, or straight from the Check screen.
- “… needs 42 periods a week but has 40.”
- The subjects ask for more periods than the days have. Lower some subjects' Periods / Week, or add periods to the day.
- Every subject shows 5 periods a week.
- That is the starting number, not yours. Set each subject's real Periods / Week.
- Some periods are under “Could not be placed”.
- Each line says why, usually a teacher who is busy in every free period or a lab that is full. Ease that teacher's limits on the Teachers screen, unlock some periods, or try another arrangement.
- Two sections share a room.
- They can never have periods at the same time. Give one of them its own home room on the Batches page.